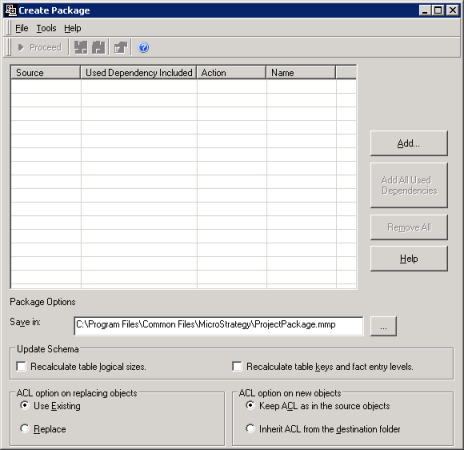
Open Object Manager –> Tools –> Create Package

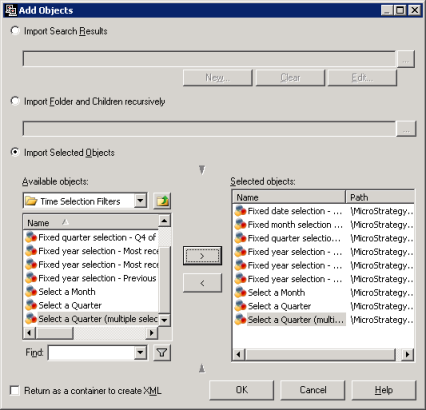
Click on ADD button and choose the objects as shown below

Select the objects either by search results or by selecting folder or by selecting objects

|
User Action |
Effect |
| Use existing | No change is made to the destination object. The source object is not copied. |
| Replace | The destination object is replaced with the source object. Note the following:
|
| Keep both | No change is made to the destination object. The source object is duplicated in the destination location. |
| Use newer | If the source object’s modification time is more recent than the destination object’s, the Replace action is used.
Otherwise, the Use existing action is used. |
| Use older | If the source object’s modification time is more recent than the destination object’s, the Use existing action is used. Otherwise, the Replace action is used. |
| Merge (user/ group only) |
The privileges, security roles, groups, and Distribution Services addresses and contacts of the source user or group are added to those of the destination user or group. |
| Do not move (table only) |
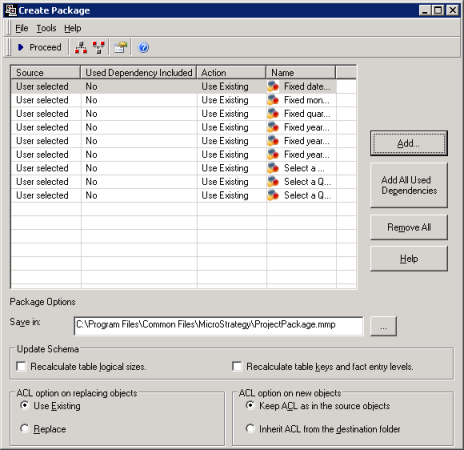
The selected table is not created in the project. This option is only available if the Allow to override table creation for non-lookup tables that exist only at source project.Click Proceed to continue and it shows the following once the package created. |
Click Proceed to continue and it shows the following once the package created

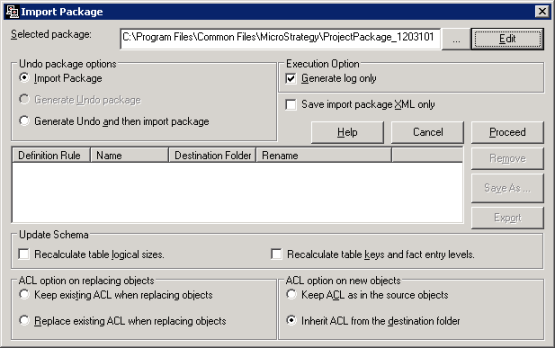
Importing a MicroStrategy Object Manager Package:

When you import an update package, you have the option of creating an undo package at the same time as the import. Alternately, you can choose to create an undo package without importing the associated update package.
You import an undo package in the same way as you import any update package. When you import an undo package, the Version ID and Modification Date of all objects in the undo package are restored to their values before the original update package was imported.
Version Control:
Select the Generate log only check box to create a log file describing the changes that would be made if the update package were imported, instead of importing the update package. Select the Save import package XML check box to create an XML file containing instructions for how to import the package, instead of importing the update package. Click Proceed to import the update package, or to create the specified supplemental files.

Edit pane
In the Edit pane of the Import Package or Import Configuration Package dialog box, you can make changes to an update package.
The Edit pane lists the contents of the update package in the following columns:
- Definition Rule: The conflict resolution rule that is applied to this object. To change the definition rule for an object, click in this column and select a new rule from the drop-down list.
- Name: The name of the object.
- Destination folder: The folder in the destination project that the object is copied into.
- Rename: The name of the object in the destination project. To change this name, click in this column and type the new name for the object.
Schema update options and ACL options for this update package.
Configuring the access control lists for copied objects
When you update or add an object in the destination project, by default the object keeps its access control list (ACL) from the source project. You can change this behavior in two ways:
- If you resolve a conflict with the Replace action, and the access control lists (ACL) of the objects are different between the two projects, you can choose whether to keep the existing ACL in the destination project or replace it with the ACL from the source project.
- If you add a new object to the destination project with the Create New or Keep Both action, you can choose to have the object inherit its ACL from the destination folder instead of keeping its own ACL. This is helpful when copying an object into a user’s profile folder, so that the user can have full control over the object.
Note: The Use Older or Use Newer actions always keep the ACL of whichever object (source or destination) is used.
These actions are also used as the default for the ACL options when creating a project update package or a configuration update package.
After successful migration

Deprecated: Function get_magic_quotes_gpc() is deprecated in /home1/microoat/public_html/blog/wp-includes/formatting.php on line 3964
Deprecated: Function get_magic_quotes_gpc() is deprecated in /home1/microoat/public_html/blog/wp-includes/formatting.php on line 3964
Deprecated: Function get_magic_quotes_gpc() is deprecated in /home1/microoat/public_html/blog/wp-includes/formatting.php on line 3964