Category Archives: Architect

Logical View columns have GUID :-D

My friend told showed me something that was kinda unbelievable. He had column REPORT_ID in 4 tables and had created 2 Logical views in MicroStrategy that also have a column named REPORT_ID. We he tried to create a new attribute based on this column REPORT_ID, MicroStrategy logical views were not getting listed as the source table 😕 . After much finding, I came to know that it is as per design. The example in the tech-note is about fact, but same issue also occurs for attributes.

If the column name is added manually via typing, it will have a different ID than the original column.

Wooof. Something never ever thought. I thought that column must be getting mapped, but no, there are GUIDs for each column too. If typed manually, there would be a new GUID created for the column in the Logical View. So, even if there are column with same names Logical View won’t get listed as Source table.

As per the tech-note: Select the desired column from the existing tables in the Warehouse Catalog, and drag it over to the Column Object.

Some nifty information about Logical Views:

  1. Logical views are embedded in the SQL as either derived tables (also known as in-line views) or common table expressions.
  2. A derived table is an independent SELECT statement that appears enclosed in parentheses in the FROM clause.
  3. Logical view produces a virtual table in the database.
  4. The column objects are matched to columns returned by the SQL statement by name, not by position. It matters only that the columns are defined and that the SQL statement provides an unambiguous name for each column. This is in contrast to a MicroStrategy Freeform SQL report, in which result columns coming back from the query are mapped onto report objects by position.The difference is that in a logical view, the mapping takes place entirely on the database, while in a Freeform SQL report, MicroStrategy has to interpret the dataset coming back from the database.
  5. The order of columns in a logical view definition cannot be changed permanently (A partial defect as the function is not as user would expect but this doesn’t add any issue in the SQL generated)

Stumbled upon this nice tech-note about Physical Modeling using Multi Source while finding information about Logical Views.

Logical views with MicroStrategy

Business intelligence architects have always relied on the Datawarehouse team to create database views or perform datawarehouse changes in order to construct the BI architecture.   If something was not architected as desired, then the BI developers were forced to request these changes, and then wait for their completion before moving forward.   Since MicroStrategy 8, BI developers have had the ability to create logical tables and table aliases to circumvent this process.  This article will go through various examples on how this can be used on an implementation.

Lookup Tables and Reuse of Dimensions – The most obvious reason for requiring logical tables or aliases is for the creation of lookup tables or reuse of dimension tables.   First off, the difference between an alias and a logical table is that an alias is an exact copy of a dimension table, and if the dimension table or alias changes then both will change.   The logical table on the other hand is a custom SQL statement that utilizes any table available to the BI developer.    Lets say we have a fact table F_FACT, that stores 3 products per transaction, but the data model only has one D_PRODUCT table.    Aliasing allows us to alias D_PRODUCT into D_PRODUCT_1, D_PRODUCT_2, and D_PRODUCT_3, so that we now have 3 separate tables to join to F_FACT.   Now, lets say that the 1st product is a laptop, the 2nd product is a battery, and the 3rd product is an AC Adapter.  We could still join F_FACT to the 3 aliased product dims, but we also want only laptops to show up in D_PRODUCT_1, only batteries in D_PRODUCT_2, and only AC Adapters in D_PRODUCT_3.   This is where logical tables can come in to play.   First, lets create a logical table called D_PRODUCT_LAPTOPS which we create with the following SQL statement, ‘SELECT * from D_PRODUCT where PRODUCT_TYPE = “LAPTOP” ‘.    Quite simply, we have created our own dimension table of laptop products without additional support from the EDW team.

Case Study:  Using Logical Views to make a Fact table from a Dimension – Lets say we have a dimension table called D_EMPLOYEE with the fields employee_key, employee_id, employee_name, record_start_date, record_end_date, employee_start_date, employee_end_date, and organization.

fig51a

Now, lets say we want to be able to count Active and Terminated employees from a fact.  Our first problem is that D_EMPLOYEE is a type 2 dimension, so we need to pull only the latest record on this dimension.   For the metric, we have the option of building the count of active and terminated employees either on the fact table or by building a fact object in MicroStrategy.  For this demonstration, we will build the counts on the fact itself.

In order to pull the latest record from D_EMPLOYEE, we will use the following WHERE condition: WHERE RECORD_END_DATE = ‘12/31/9999′ or RECORD_END_DATE = EMPLOYEE_END_DATE which will pull the latest record for each employee.

For the facts, we will add the following fields to the SELECT part of the query: CASE WHEN RECORD_END_DATE = ‘12/31/9999′  THEN  1 ELSE 0 END as ACTIVE AND  CASE WHEN EMPLOYEE_END_DATE is not null THEN  1 ELSE 0 END as TERMINATED.

The Final Logical table will look as follows, and now we have a new fact table.

fig52a

Case Study:  The POOL technique – Once you start to use Logical table , you will start to see that this can be a very powerful tool that can accomplish a great deal, as long as performance allows it.   Please note that these table Views just serve as queries on the database, and are not materialized in anyway.   What I often do after creating a complicated logical view is run it through a query tool like Toad.   If it does not return results immediately, then I send the query off to our DBA to see what they can do.

The POOL technique (which I’ve named it) is actually a technique for developing complex SQL reports when there are no data warehouses or BI Tools.  The point here is that you can use this technique to develop a complex piece of SQL, and then use that SQL in a MicroStrategy logical view, so you can build metrics and attributes on top of that SQL.   This technique is also great for developing Freefrom SQL queries in MicroStrategy.

The concept is simple.  First develop a query that gets you as far as you can with the base tables, and then use that query as the base table for a new query.   Repeat until you have what you need.  One other point is to try to avoid Sub Selects as much as possible because they can seriously slow down performance.

Lets use the table D_EMPLOYEE above and the logical view F_EMPLOYEE as our basis.  The report we want to create is a list of active employees, their current organization, and the number of organizations they’ve been in.  If the number of organizations is greater than 5 then we want to mark this record as a MOVER.

First, we build SQL to get as far as we can.  I don’t put the number of Organizations in this query for illustrative purposes, but do you see how to calculate number of Organizations in this query without a sub Select?

fig53

Next we use the statement just created as the base table for the next select, and name this base table POOL.  We then create a query based on POOL which now calculates the Number of Organizations.
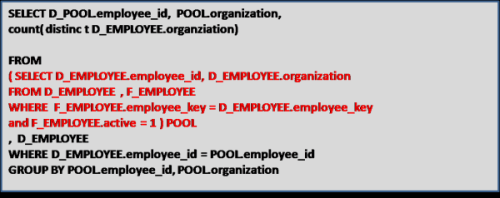
fig54

Now we use the SQL statement above for our base table, and call that table POOL2.   We do this to add the MOVER field to the report.
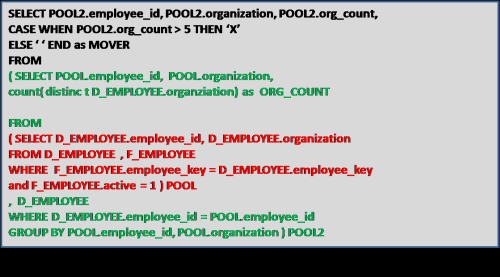
fig55

We can keep going if we had more complex requirements, but the point is that this technique can be used to develop complex queries, which we can then plop into a MicroStrategy logical tables.   Maybe we will create an attribute called MOVER?   The options are now far greater with logical tables.

Cannot save or move object System Hierarchy with id xxxx and type Hierarchy

Error: Cannot save or move object `System Hierarchy` with id ‘xxxx’ and type ‘Hierarchy’.

Symptoms: When try to create/modify new attribute the above error occurs.

Solution: Download ScanMD (8x), You can use the ScanMD (8x) for version 9 also.

1.  Start ScanMD
2.  Go to Step 3, and click “Add test”
3.  Select TQMS357866.dll

And continue the ScanMD process, Now the above error will get fixed.

Suggestions: Don’t create/modify Schema object in parallel.

Download the file here.

Historical Master Data Attributes

Historical master data attributes are often specially handled when designing an Enterprise Data Warehouse (EDW).   On most BI projects I’ve been on, there is an exercise of sitting with the business in order to determine which attributes are required to be stored historically.  Once this is complete, the requirements are then sent off to the Data Warehouse team for design and development.  How this solution gets architected may be one of the determining factors on whether your project is successful or not, and as a BI team member, sometimes getting your two cents can make your life that much easier.

In the past, I’ve come across three different designs for handling historical master data attributes, with one of them standing out above the rest.    The first design involves placing historical attribute fields directly on to fact tables.  Please remember we are talking about historical attributes that are master data related, and not historical attributes that are related directly with transactions.  The major issue with this comes about during validation and warehouse maintenance if data problems exist.   In order to validate that ETL processes are working properly, one now has to validate every row in fact table to make sure that the  historical attribute is correctly derived.   Also, because this attibute is stored at the fact level, we now have to add this attribute to any new fact tables when needed.  If, for any reason, problems are found in the historical attribute derivation, then the fact tables have to be dropped and reloaded, then re-validated.  Simply put, this solution should not be used if it can be avoided.

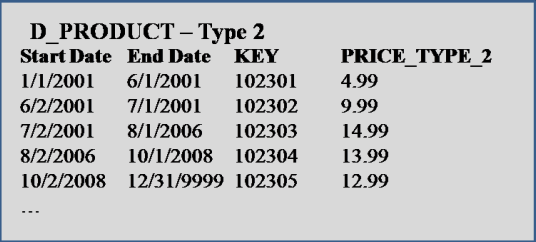
Another design which is quite popular is the use of time based, type 2 dimensions.  This solution involves storing attributes, along with the date range for which those values are valid.   So for example:

fig21a

This solution works just fine in conjunction with a fact table.  To pull the current value of an attributes, we only need to pull the latest record, usually marked with an end date of ‘12/31/9999′.   The only issues that come about with this approach is one, if you store more than one historic attribute on a dimension, then reporting history of those attributes without joining to a fact table cannot be accomplished.    From our example diagram above, notice that the Price Type field is accurately showing history, but Placement Type contains an extra record showing Aisle 5 starting on both 6/1/2001 and 7/1/2001.   One solution for avoiding this, is to store the Previous values for every historic attribute, and then only pull historic data for an attribute if the Prev value <> Current value.  The second issue often comes about when ETL is used to create history in the warehouse.   This may be the only possible solution, but allowing this can ’open up a can of worms’, and now makes validation a much more difficult process.

The recommended solution here actually involves setting rules to the type 2 dimension just discussed.   First off, only track the history of one historic attribute per dimension table.

fig21d

This simplifies the ETL and data storage designs, and also eliminates the confusion when you have more than one historical attribute on a table.    Storing the data in this way not only seems more natural, but also simplifies the validation and maintenance of the historical data.   If a problem is found, then quite simply, fix that problem in one place rather than dealing with more complex ETL procedure used to track multiple historic fields on one table.  Second, don’t use ETL to create history if it can be helped.   ETL created history only starts at the time that the ETL script is implemented, so you never get a full view of history unless it was implemented from the beginning.   Also, ETL created history is difficult to validate, and in the case that problems arise, fixing that history can also be a problem.   Of course, every implementation is different, and you may not have a choice.  All of the information in this article has been tested thoroughly through implementation via MicroStrategy 8.1.

Automatic Column Recognition in MicroStrategy 9

Architect 9.x can automatically create attributes and facts in order to save time during the schema creation process. The facts and attributes are created based on data types, database column names, primary and foreign keys, and other schema creation heuristics. The user can define how attributes and facts are created when tables are added to the project by defining the automatic column recognition rules available in the MicroStrategy Architect Settings menu, by following the steps.

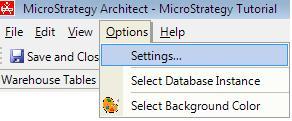
  1. Open the Setting menu, located under Options.
    Step 1
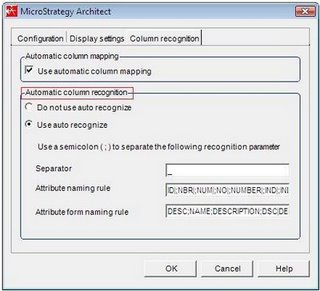
  2. Go to the Column Recognition tab.
    Step 2
  3. Do not use auto recognize option is used to disable the automatic creation of attributes and facts when tables are added to the project using Architect. Uncheck this radio button.
  4. Use auto recognize option is used to enable the automatic creation of attributes and facts when tables are added to the project using Architect. These are created based on the following schema creation heuristics and rules:
    • Separator: The character used as a separator in the database column names. For instance, a database column name such as USER_ID uses the undersocre character (_) as a separator.
    • Attribute naming rule: Database column name suffixes that identify that the columns should be mapped to a new attribute as the identity form. A semicolon (;) can be used to separate suffixes that are to be mapped to new attributes. It is also possible to define how the attribute name is created by using a vertical bar () to define what the suffix is replaced with in the resulting attribute name.
    • Attribute form naming rule: Database column name suffixes that identify that the columns should be mapped to a new attribute form.
  5. In addition to using these rules to define attributes and attribute forms, selecting the Use auto recognize option also employs other schema creation heuristics:
    • The automatic column mapping rules described in Automatically column recognition are employed to map columns to existing attribute forms that use the columns in their definitions.
    • An attribute is created for any column defined as a primary or foreign key, and the column name for the primary key is used to define the attribute name. The column name for the primary key is used to define the attribute name even if the primary key column is not included in the project.
    • Every column must be mapped to either a fact or an attribute. If none of the schema creation heuristics or the rules you define can determine whether to create a fact or attribute for the column, an attribute is created for the column.
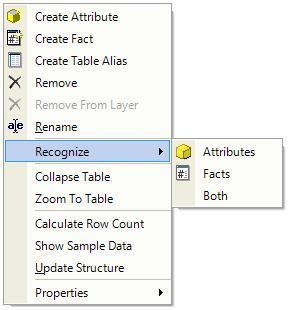
  6. Even when the option to not use auto recognize is selected, it is still possible to take advantage of the auto recognize feature on a table on table basis. Right click on the table in the Architect Project Tables View. Select Recognize > Attributes, Facts, or Both.
    Additional Step