Troubleshooting steps
1. Check the report SQL generated in different environments (PROD, UAT and DEV). Match the SQL generated. Technically they *must* match. If they are NOT matching, you need to correct your attribute definition and/or parent-child relationship. FYI, Tedatada is not so forgiving for mismatched column types in database and as declared in attribute form definition.
2. Check the Load on database server. It may be offline, too much loaded with requests.
3. Job priority in the Server can 32432432a report in queue for long/infinite. Check MicroStrategy System Monitor under Project Source Administration.
4. Verify that you SQL is being run against the correct database. Check the Project DB Instance.
5. Your schema object definition is up to date. Try updating Schema.
6. Non MicroStrategy cause: Some Web Server load balancer can made to time out a query/request if not resolved under a stupulated time. Check Load Balance team.
Bursting is a feature in MicroStrategy Distribution Services 9.3 that generates page-by slices and stores results to separate files via subscriptions
Reports and Report Services Documents can use the bursting feature if they are using page-by view filters, and files produced with bursting can use macros to generate unique, individual file names.
- Choose a suitable Report or Report Services Document and create a new subscription
- Under the “File” heading, select “Add file subscription”
- Directly under “File Name” click the button labeled “Burst…”
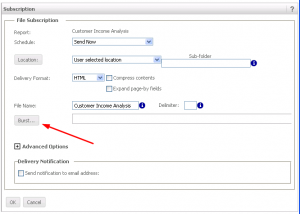
4.The selector boxes will show the Page-By attributes in the left box. Move attribute from the “Available” box to the “Selected” box to burst according to those attributes. Selected Attributes will show in the bar above the selector
5. The file name can be defined in the File Name blank using the following shortcuts:
- Bursting Attribute: {[Attribute Name]@[Attribute Form]}
- Date: %%Date%% or {&Date}
- Time: %%Time%% or {&Time}
- Recipient Name: %%RecipientName%% or {&RecipientName}
- User Login: {&UserLogin}
- Subscription Name: {&Subscription}
- Project Name: {&Project}
- Prompt N: {&Prompt#&}
- Content Name: {&ContentName}
- Content Details: {&ContentDetails}
6. After filling in the remaining required File Subscription options, click OK to accept these options
MicroStrategy 9.3 What’s New
-
- Tools called MicroStrategy System Manager and System Manager, which can “flow chart” job of Command Manager, Object Manager, Architect and Windows components. Personally very excited to get my hands on this.
- Search has feature suggestion like Google search. nah.. not that excited. I know what I do but good for people with bad memory.
- Reports can be subscribed to emails/DLs not stored in the metadata (currently it requires). Need to check, but expect a late reply on this.
- Different users would get different copy of same file in same location using a better slicing logic.
- File import from Salesforce.com w/o ODBC driver, LAN locations. Direct import of cross tab excels files. Fire up your visualization.
- Data mach-up/selection during file import. Pretty good.

- Testing of multipass SQL. For developers, this feature would help a lot in troubleshooting the reports. Wow.
- More integrated to R, best statistical model programming language.
- Crap feature called “Derive metric” available in Visual Insight too. This feature makes BA waste their time in “Self serviced BI”.
- Synchronized drilling in dashboard. Pretty good. My current client was expecting this to accomplish this in current MicroStrategy.
- Ability to export potion of dashboard instead of whole.
- Ability to save personalized view of Dashboard. Business user will ove this, as different users create copies of same report for their connivance of view.
- Native connector for Apache Hadoop.
- SAP HANA supported minus Partition Tables.
- For first time, Multi pass SQL will execute in parallel. But looks like this is good only for multi source reports.
- Bloody cool feature of MicroStrategy Health but they will not advise/advertise this. IF you are a MicroStrategy customer, you must use it. Free and excellent feature to track your MicroStrategy implementation.
- Better data valiation in Transaction Services. Very select few client for this feature. No word from MicroStrategy on this if same would work from iDevices.
- Passing prompt answers between dashboard. I believe this feature was already available. Old wine in new bottle.
————-
Feature missing
- Transformation Prompt is under pipeline for last SIX years.
- Metric creation/manipulation in MicroStrategy Web was highly expected in this build itself. May be another year.
MicroStrategy Object Manager Package
Open Object Manager –> Tools –> Create Package

Click on ADD button and choose the objects as shown below

Select the objects either by search results or by selecting folder or by selecting objects

|
User Action |
Effect |
| Use existing | No change is made to the destination object. The source object is not copied. |
| Replace | The destination object is replaced with the source object. Note the following:
|
| Keep both | No change is made to the destination object. The source object is duplicated in the destination location. |
| Use newer | If the source object’s modification time is more recent than the destination object’s, the Replace action is used.
Otherwise, the Use existing action is used. |
| Use older | If the source object’s modification time is more recent than the destination object’s, the Use existing action is used. Otherwise, the Replace action is used. |
| Merge (user/ group only) |
The privileges, security roles, groups, and Distribution Services addresses and contacts of the source user or group are added to those of the destination user or group. |
| Do not move (table only) |
The selected table is not created in the project. This option is only available if the Allow to override table creation for non-lookup tables that exist only at source project.Click Proceed to continue and it shows the following once the package created. |
Click Proceed to continue and it shows the following once the package created

Importing a MicroStrategy Object Manager Package:

When you import an update package, you have the option of creating an undo package at the same time as the import. Alternately, you can choose to create an undo package without importing the associated update package.
You import an undo package in the same way as you import any update package. When you import an undo package, the Version ID and Modification Date of all objects in the undo package are restored to their values before the original update package was imported.
Version Control:
Select the Generate log only check box to create a log file describing the changes that would be made if the update package were imported, instead of importing the update package. Select the Save import package XML check box to create an XML file containing instructions for how to import the package, instead of importing the update package. Click Proceed to import the update package, or to create the specified supplemental files.

Edit pane
In the Edit pane of the Import Package or Import Configuration Package dialog box, you can make changes to an update package.
The Edit pane lists the contents of the update package in the following columns:
- Definition Rule: The conflict resolution rule that is applied to this object. To change the definition rule for an object, click in this column and select a new rule from the drop-down list.
- Name: The name of the object.
- Destination folder: The folder in the destination project that the object is copied into.
- Rename: The name of the object in the destination project. To change this name, click in this column and type the new name for the object.
Schema update options and ACL options for this update package.
Configuring the access control lists for copied objects
When you update or add an object in the destination project, by default the object keeps its access control list (ACL) from the source project. You can change this behavior in two ways:
- If you resolve a conflict with the Replace action, and the access control lists (ACL) of the objects are different between the two projects, you can choose whether to keep the existing ACL in the destination project or replace it with the ACL from the source project.
- If you add a new object to the destination project with the Create New or Keep Both action, you can choose to have the object inherit its ACL from the destination folder instead of keeping its own ACL. This is helpful when copying an object into a user’s profile folder, so that the user can have full control over the object.
Note: The Use Older or Use Newer actions always keep the ACL of whichever object (source or destination) is used.
These actions are also used as the default for the ACL options when creating a project update package or a configuration update package.
After successful migration

SharePoint Integration with MicroStrategy
Recently, while working on one of my project assignments I got to work on the integration of SharePoint 2010 with MicroStrategy 9. The requirement was to pull the report from the MicroStrategy and show that in a web part. We had the MicroStrategy environment set up and also I had my SharePoint development environment set up.Here, I will show you how you can configure the SharePoint environment to pull reports from the MicroStrategy. When you contact MicroStrategy for their portlets, which can be plugged with SharePoint, you will get a .CAB file. This CAB file has two web parts in it 1) ‘MicroStrategy Master Web Part’ 2) ‘MicroStrategy Web Part’. This also has MSTRWebParts.dll which, you can use to create a custom web part to display data from MicroStrategy(I will talk about this in other post), and a few .js files. You might be thinking “Enough of talking, Take me to the procedures of configuration”. So here you go:
Step 1: Install the CAB file: Log in to the server machine as an Administrator. To install the CAB file you can use following commands:stsadm.exe -o addwppack -filename “$your_location_of_cab_file$\MSTRWebParts.CAB”.
Step 2: Configuring security for the MicroStrategy Web Part:
To configure the security either you can elevate the permission level to ‘Full Trust’ in the web.config file, which is neither a good practice nor secure, or you can use Trust level as WSS_minimal” and modify the appropriate policy configuration file which is located at “C:\Program Files\Common Files\Microsoft Shared\Web Server Extensions\14\Config\wss_minimaltrust.config” and make an entry for MSTRWebParts.dll in the <CodeGroup> section. You can read more about it over the net. There are many good articles explaining “Custom CAS policy for SharePoint”. You can also follow this Microsoft documentation.
Step 3: Enabling HTTP Session State in SharePoint
The MicroStrategy Web Part for the SharePoint Portal requires the HTTP Session State to be enabled. However, by default, HTTP Session State is disabled by the SharePoint Portal Server. To enable the HTTP Session State in SharePoint Portal 2010, you must modify the web.config file for SharePoint (located by default under C:\Inetpub\wwwroot\wss\VirtualDirectories\ and SharePoint Admin (located by default under C:\Inetpub\wwwroot\wss\VirtualDirectories\.
Note: It is a good practice to make a backup of important configuration files, such as the web.config file, before making changes.
To enable HTTP Session State, use any text editor to make the following changes to the web.config files in the locations described above:
- Enable the SessionStateModule:
Add the node shown in bold below as a child node for the node:Before:<httpModules/>
After:
<httpModules>
<add name=”Session” />
</httpModules>
-
- Enable the SessionState:
Find the node beneath . Set the enableSessionState attribute to “true”.
- Add the session state module to the IIS (Internet Information Services) 7 managed pipeline for MicroStrategy Web.
- Open IIS 7 Manager and find SharePoint.
- Double-click Modules in the IIS section.
- Click Add Managed Module … in the right-hand pane.
- On the Add Managed Module dialog, enter a name such as “SessionState” and choose System.Web.SessionState.SessionStateModule from the dropdown.
- Restart IIS for the changes to take effect.
Step 4: Creating User Profiles for MicroStrategy Credentials and Locals:
To set user credentials and locales for a MicroStrategy Web Part, you must add the necessary user profile properties on the SharePoint Portal Server. To set these properties, do the following:
- Open SharePoint Central Administration, click Manage Service Applications under Applications and then click on User Profile Service Application. On the page that opens, click on Manage User Properties under People and then click on New Property
- In the Property Settings textboxes, add the properties listed below, using the values provided or indicated. If you want to give users the ability to change credentials or set locales, choose “Allow users to edit values for this property” in the Edit Settings options.
PropertySettingsNameDataLocaleDisplayLocaleMSTR-UIDMSTR-PWDMetadataLocaleDisplay nameData LocaleDisplay LocaleMicroStrategy UserMicroStrategyPasswordMetadata LocaleTypeintegerintegerstringstringstringintegerSub-type of ProfileMake sure that the checkbox for “Default User Profile Sub-type” is checkedPolicy SettingsSelect “Optional”, rather than “Required” (which is the default selection)Edit SettingsSelect “Allow users to edit values for this property”When you make these property settings, you must use the exact property names and types shown in the table above, but you can use different display names if you want.
You can choose whether or not to let user see or edit these settings. To give users the ability to change credentials or set locales in a MicroStrategy Web Part, you must add the necessary user profile properties on the SharePoint Portal Server.
If you don’t want Web Part users to be able to change the data locale or display locale, the DisplayLocale and DataLocale profile properties are optional. In this case, the SharePoint Portal user’s language setting will be used for these two locales. If you use only Windows Authentication or Guest Authentication, the MSTR-UID and MSTR-PWD profile properties are also optional.
If you don’t want to allow Web Part users to change the values for any of their user profile properties (DataLocale, DisplayLocale, MSTR-UID, or MSTR-PWD) on the edit pane, you should not change Edit Settings to “Allow Users to edit values for this property”. When this setting is not made, only portal server administrators can assign and change the values for these profile properties in the Shared Services Administration page.
That’s it. You are good to go now. Go to the page>Edit Page and add “MicroStrategy Web Part” to it and configure all its values. If you have proper permissions to your MicroStrategy environment then you should be able to see the report that you have configured in the web part settings.
[This blog may not be relevant]