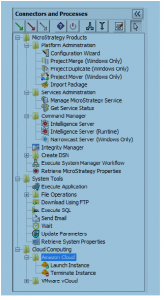
Recently explored the ‘System Manager’ component in MicroStrategy 9.3.1 version. it’s a very helpful tool for those working as Admin, project designer, project lead/manager (who handles entire BI-MicroStrategy components). This reduces the pain and helps to automate the entire schedule process example, if the narrowcast service dependent on cube and cube is on depend on data load, then it can be automated using ‘System Manager’ work flow.
The document (PDF) provided by MicroStrategy is very clear to understand and very easy to create any work flow. Only important point is, whoever design the work flow should capture every success and failure possibilities and handle those success/failures in the work flow.
What is work flow?
System Manager, it’s like a ETL Job, where you can create a workflow visually, allowing you to see the step-by-step process that leads the workflow from one process to the next. This visual approach to creating a workflow can also help you to notice opportunities to troubleshoot and error check processes as part of a workflow.
Here are the few important points to be known before developing any work flow. There is no code, program required to develop a work flow. It’s all about drag & drop and set the properties. For each object you drag & drop, properties can be set.
Work flow components:
- Workflow – One Complete job is called Work flow (like in ETL tools, there can be one or more Workflow
- Parameters – For every step you can assign Name and values, which will make use of the values for the assigned job in the work flow
- Exit Codes – While defining the process (work flow), you can assign the exit codes, which says whether it’s success or failure and also description for the same. On the Properties pane, scroll down to the bottom and click Show Descriptions. Later we can see it in the example
- Connectors –
Success – If the current process is completed with an exit code that is defined as a successful status, the process that the success connector points to is the next process that is attempted.
If you use a success connector from a process, it is recommended that you also use a failure connector.
Failure – If the current process is completed with an exit code that is defined as a failure status, the process that the failure connector points to is the next process that is attempted.
If you use a failure connector from a process, it is recommended that you also use a success connector.
Continue – Regardless of the status of the exit code for the current process, the process that the continue connector points to is the next process that is attempted.
If you use the continue connector from a process, you cannot use any other connectors for that process.
- Decision – A decision process is created in the workflow, as shown in the image below. Decisions provide the ability to determine the next process in a workflow based on specific exit codes for the previous process, rather than just the simple success or failure of a process
- Toggle Entry Process – This enables or disables a process as an entry process for the workflow. A process that is defined as an entry process is displayed with a green flag symbol, as shown in the image below.
- While any process, other than an exit process, can be enabled as an entry process for a workflow, you should limit the steps that are enabled as entry processes for various reasons:
- Split Execution – A split execution process lets you start multiple threads in a workflow to perform parallel processing of the tasks in a workflow. This can speed up execution of a workflow for systems that can handle the parallel processing.
- Merge Execution – A merge execution process is created in the workflow
- Comment icon – comment is created in the workflow. Comments can be used to provide additional explanation to the design of a workflow
- Exit Workflow – An exit process allows you to end a workflow as well as explain how the workflow ended.
- Validate Workflow – If the workflow is listed as valid, click OK to close the dialog box. If the workflow is not valid, click Details to review the reasons why the workflow is not valid. Click OK and make any required changes to the workflow. Once all changes are made, validate the workflow again.
- Log – Log file can be generated for the work flow
- Properties and parameters – Storing user credentials within System Manager introduces a security risk. Configuration information is not known until or during the actual configuration.
- Parameters can be stored as a file and reuse it in any work flow
There are more features available in MicroStrategy System Manger, those can be find in MicroStrategy’s supporting PDF and help menu in System Manager.
Deprecated: Function get_magic_quotes_gpc() is deprecated in /home1/microoat/public_html/blog/wp-includes/formatting.php on line 3964
Deprecated: Function get_magic_quotes_gpc() is deprecated in /home1/microoat/public_html/blog/wp-includes/formatting.php on line 3964
Deprecated: Function get_magic_quotes_gpc() is deprecated in /home1/microoat/public_html/blog/wp-includes/formatting.php on line 3964