Category Archives: Narrowcast Server

MicroStrategy System Manager – Awesome Tool !!

Recently explored the ‘System Manager’ component in MicroStrategy 9.3.1 version. it’s a very helpful tool for those working as Admin, project designer, project lead/manager (who handles entire BI-MicroStrategy components). This reduces the pain and helps to automate the entire schedule process example, if the narrowcast service dependent on cube and cube is on depend on data load, then it can be automated using ‘System Manager’ work flow.

The document (PDF) provided by MicroStrategy is very clear to understand and very easy to create any work flow. Only important point is, whoever design the work flow should capture every success and failure possibilities and handle those success/failures in the work flow.

What is work flow?

System Manager, it’s like a ETL Job, where you can create a workflow visually, allowing you to see the step-by-step process that leads the workflow from one process to the next. This visual approach to creating a workflow can also help you to notice opportunities to troubleshoot and error check processes as part of a workflow.

Here are the few important points to be known before developing any work flow. There is no code, program required to develop a work flow. It’s all about drag & drop and set the properties. For each object you drag & drop, properties can be set.

Work flow components:

  1. Workflow – One Complete job is called Work flow (like in ETL tools, there can be one or more Workflow
  2. Parameters – For every step you can assign Name and values, which will make use of the values for the assigned job in the work flow
  3. Exit Codes – While defining the process (work flow), you can assign the exit codes, which says whether it’s success or failure and also description for the same. On the Properties pane, scroll down to the bottom and click Show Descriptions. Later we can see it in the example
  4. Connectors –

                           Success – If the current process is completed with an exit code that is defined as a successful status, the process that the success connector points to is the next process that is attempted.

If you use a success connector from a process, it is recommended that you also use a failure connector.

                           Failure – If the current process is completed with an exit code that is defined as a failure status, the process that the failure connector points to is the next process that is attempted.

If you use a failure connector from a process, it is recommended that you also use a success connector.

                          Continue – Regardless of the status of the exit code for the current process, the process that the continue connector points to is the next process that is attempted.

If you use the continue connector from a process, you cannot use any other connectors for that process.

  1. Decision – A decision process is created in the workflow, as shown in the image below. Decisions provide the ability to determine the next process in a workflow based on specific exit codes for the previous process, rather than just the simple success or failure of a process
  2. Toggle Entry Process – This enables or disables a process as an entry process for the workflow. A process that is defined as an entry process is displayed with a green flag symbol, as shown in the image below.


  1. While any process, other than an exit process, can be enabled as an entry process for a workflow, you should limit the steps that are enabled as entry processes for various reasons:
  2. Split Execution – A split execution process lets you start multiple threads in a workflow to perform parallel processing of the tasks in a workflow. This can speed up execution of a workflow for systems that can handle the parallel processing.
  3. Merge Execution – A merge execution process is created in the workflow
  4. Comment icon – comment is created in the workflow. Comments can be used to provide additional explanation to the design of a workflow
  5. Exit Workflow – An exit process allows you to end a workflow as well as explain how the workflow ended.
  6. Validate Workflow – If the workflow is listed as valid, click OK to close the dialog box. If the workflow is not valid, click Details to review the reasons why the workflow is not valid. Click OK and make any required changes to the workflow. Once all changes are made, validate the workflow again.
  7. Log – Log file can be generated for the work flow
  8. Properties and parameters – Storing user credentials within System Manager introduces a security risk. Configuration information is not known until or during the actual configuration.
  9. Parameters can be stored as a file and reuse it in any work flow

There are more features available in MicroStrategy System Manger, those can be find in MicroStrategy’s supporting PDF and help menu in System Manager.
 

Triggering Narrowcast Jobs from Command Prompt

When I was a project manager, the developers that I worked with setup the Narrowcast jobs to kick off automatically once the ETL loads had completed.  Well, I recently had to figure out for myself how to do this, and after piecing all the technologies together and reading through a few MicroStrategy support notes, I felt it would probably be a good thing to document in this blog.   The below example was performed using a Windows NT Narrowcast server.

Well, triggering Narrowcast Services, first off can be done through MicroStrategy Command Manager. If it is not installed on your Narrowcast box, first go ahead and install the application there.

You will then need to log on to your Narrowcast Meta data from Command Manager in order to test your connection.   First off, your Narrowcast implementation and Command Manager install needs to be at the same support level, so I had to first upgrade my Narrowcast application.   Second, you have to setup a system DSN for your Narrowcast Metadata.  From there, you can log on to Narrowcast Metadata from Command Manager.  Here is some sample Command Manager code for kicking off a Service:

TRIGGER SERVICE “Service Name” IN FOLDER “Applications/My Applications/Services/”;

In Command Manager, I then save this code into a .scp file.  In order to kick off this Command Manager file, we then create a windows .bat with the following commands:

if not exist c:\cmdmgr\trigger.txt goto 20

cmdmgr.exe -w SQLServer -u user -p pass -d master -s dbo.PROD -f c:\cmdmgr\job.scp -o c:\cmdmgr\output.txt

del c:\cmdmgr\trigger.txt

goto end

:20

:end

This windows first checks for a trigger file (that will be supplied by the ETL team).  If the trigger file exists, then it kicks off the .scf script and then deletes the trigger file.    If the trigger file does not exist, then the .bat files does nothing.  Shown below is the command manager line explained further:

fig61

If you are having problems with the script, just test the cmdmgr.exe line in the .bat file.   You should be able to doubleclick the .bat and the service should run almost immediately.

Once you have all the above setup, it is just a matter of scheduling the .bat file to run every so often (15 minutes in our case).   I have yet to find a true trigger solution using Narrowcast.   I always have to setup a job which runs repeatedly until a flag is set, and then the job kicks off the actual report service.   Whether this flag is a database flag or a trigger file, the word ‘trigger’ is misleading because the report service is not really being triggered by the ETL load completion.  A easier solution for triggering Narrowcast jobs would be a very nice to have in one of Narrowcast’s later releases.

Just FYI, in order to schedule the .bat file to run every 15 minutes, I went into Settings->Control Panel->Scheduled Tasks, and just created a Scheduled Task using the wizard.   Click on the Advanced push button to select a schedule that is more frequent than just once a day.

This was not rocket science, but just thought it would be something nice to document.

Customizing Narrowcast XSL

In Narrowcast Server, when you use report in EXCEL document, instead of normal report output; you can customize the output result based on your own design by modifying default Narrowcast XSLT.

In order to design Narrowcast XSLT, first we need to understand the Report XML and its content present in XML file.

How to get the get the report xml:

  1. Run the corresponding report in the WEB.
  2. In the Address Bar, enter ‘&XML=1’ at the end of the URL as shown below.
  3. Right click in Browser and Select the ‘ViewSource’ option.
  4. Search for ‘<mi’ in the Source and starting from the ‘<mi’ tag copy till end tag (i.e) ‘mi>’.
  5. Paste the copied text in notepad and save it in ‘.xml’ file.

Note: Report data Tag starts with <RH>

Narrowcast XSLT’s and Tags specific to spreadsheet

Note: All aspects of this XML specification, including element (tag) names, attribute names, and attribute values are case sensitive. •

  • The pt-container is the root level of every Excel XML document element that contains the table tag. This tag is required.
  • The table tag contains both content and formatting tags for turning data into a well-formatted grid. The resulting grid overwrites a contiguous rectangle of cells in an Excel workbook when an Excel document is rendered. An Excel XML document element can contain only one table tag.
  • The fonts tag contains the set font definitions that control the font characteristics of cells written into the Excel workbook. Font definitions include font type, color, size, weight, and modifiers like italic. An Excel XML document element can contain only one fonts tag.
  • The font tag contains the definition of a specific font used for this document element. Zero or more font tags are required.
  • The styles tag contains the set style definitions that control cell formatting for cells written into the Excel workbook. Style definitions include all font characteristics as well as background color, orientation, alignment, and borders. An Excel XML document element can contain only one styles tag.
  • The style tag contains the definition of a specific style that is used for this document element. Zero or more style tags are required.
  • The formats tag contains the set of format strings that are used to format date, time, and numeric cell contents. An Excel XML document element can contain only one formats tag.
  • The format tag contains the definition of a specific format string that is used for this document element. Zero or more format tags are required.
  • Each row in a table contains cells. A blank row can be represented by the inclusion of a row containing an empty cell. One or more row tags are required.
  • Each cell in a row contains the data that should be placed into the corresponding cell in the resulting grid. One or more cell tags are required.

Sample Report output and used to design the XSL

Country Region Revenue
USA Northeast

$2,334,864

Mid-Atlantic

$3,413,340

Southeast

$2,016,186

Central

$1,773,270

South

$1,380,991

Northwest

$1,485,182

Southwest

$2,816,334

Web Web

$1,716,267

Sample XSL created for the above Report (you can take default Narrowcast XSL and Modify the content except parent tags)

[sourcecode language=”xml”]
<?xml version="1.0"?>;
<xsl:stylesheet version="1.0" xmlns:xsl="http://www.w3.org/1999/XSL/Transform">;
<xsl:output method="xml" omit-xml-declaration="yes" indent="yes" />;
<xsl:template match="/">;

<pt-container>;

<table row-count="3" column-count="12">;

<fonts>;
<font name="ObjectName1" family="Arial" size="10" weight="bold" style="italic" />;
<font name="ObjectName2" family="Arial" size="10" weight="bold" style="italic" />;
<font name="ObjectName3" family="Arial" size="10" weight="bold" style="italic" />;
<font name="ObjectValue1" family="Coronet" size="11" weight="bold" color="12" />;
<font name="ObjectValue2" family="Coronet" size="11" weight="bold" color="12" />;
<font name="ObjectValue3" family="Coronet" size="11" weight="bold" color="12" />;
</fonts>;

<styles>;
<style name="SObjectName1" background-color="47" align="center" border-top="style:medium" border-right="style:medium" border-left="style:medium" border-bottom="style:medium" font="ObjectName1" />;
<style name="SObjectName2" background-color="44" align="center" border-top="style:medium" border-right="style:medium" border-left="style:medium" border-bottom="style:medium" font="ObjectName2" />;
<style name="SObjectName3" background-color="34" align="center" border-top="style:medium" border-right="style:medium" border-left="style:medium" border-bottom="style:medium" font="ObjectName3" />;
<style name="SObjectValue1" background-color="47" align="center" border-top="style:medium" border-right="style:medium" border-left="style:medium" border-bottom="style:medium" font="ObjectValue1" />;
<style name="SObjectValue2" background-color="44" align="center" border-top="style:medium" border-right="style:medium" border-left="style:medium" border-bottom="style:medium" font="ObjectValue2" />;
<style name="SObjectValue3" background-color="34" align="center" border-top="style:medium" border-right="style:medium" border-left="style:medium" border-bottom="style:medium" font="ObjectValue3" />;
</styles>;

<formats/>;
<row>;
<cell style="SObjectName2" type="8">;Region</cell>;
<xsl:for-each select="/mi/rit/vw/gr/rh/rw">;
<xsl:if test="./h[1][@rfd=’4′]“>;
<cell style="SObjectValue2">;<xsl:value-of select="./h[2]/fv"/>;</cell>;
</xsl:if>;
<xsl:if test="./h[1][@rfd!=’4′]“>;
<cell style="SObjectValue2">;<xsl:value-of select="./h[1]/fv"/>;</cell>;
</xsl:if>;
</xsl:for-each>;
</row>;

<row>;
<cell style="SObjectName3" type="8">;Revenue</cell>;
<xsl:for-each select="/mi/rit/vw/gr/rh/rw">;
<xsl:if test="./h[1][@rfd=’4′]“>;
<cell style="SObjectValue3">;<xsl:value-of select="./mv"/>;</cell>;
</xsl:if>;
<xsl:if test="./h[1][@rfd!=’4′]“>;
<cell style="SObjectValue3">;<xsl:value-of select="./mv"/>;</cell>;
</xsl:if>;
</xsl:for-each>;
</row>;

</table>;

</pt-container>;
</xsl:template>;
</xsl:stylesheet>;
[/sourcecode]

Output for the above Report along with the XSL

1) Save the above XSLT

2) Insert the XSLT as XSL file in Narrowcast Server

3) In the documents, while mapping report in EXCEL document; Map this XSLT for the particular report

4) complete the service (as we do normally)

5) Run the service, you will get the customized output

Narrowcast XLST output

Narrowcast XLST output

Narrowcasting Dashboards through email

Last year, our group was tasked with developing a MicroStrategy dashboard that was to show Daily, Weekly, and Monthly views of the business from 5 different perspectives.  The dashboard was to contain 30 reports each with about 3 to 15 rows of data and 10 columns.  The dashboard was to run nightly and needed to be e-mailed to about 75 executives.  This was THE report for the enterprise.   Every solution we came up with was developed all the way through and tested only to find out that there would be file size and report performance problems.  This article will describe each approach, and will finish with the selected solution.

Our initial approach was to attempt to provide the most pleasant user experience possible by building an interactive Flash dashboard.   For two weeks we worked through the dashboard development, layering panel after panel, placing report upon panels at various levels, and manually formatting each and every pixel.   The end product was both interactive and pleasing on the eyes.   We thought we were merely steps away from completion.   We then began testing our product by emailing the dashboard through Narrowcast.  We quickly noticed that the dashboard e-mail was 2 MB, and took about 10-15 seconds to load.   The size of the e-mail was a bit larger than we would have liked, and 10-15 seconds of wait time was unacceptable.  The solution was quickly dumped, and we started to look at our options.

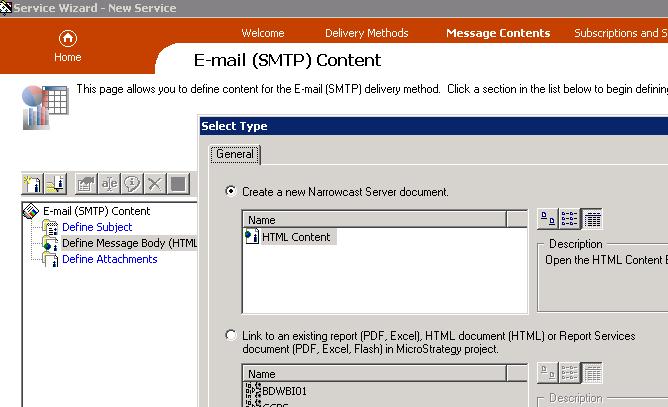
Excel or PDF attachments are always a great option when narrowcasting reports, and the size of these documents are very efficient.   However, this dashboard was required to be viewed directly from the e-mail mainly because of the audience that it was built for.   Shown below are the options in Narrowcast for what can be included in the body of an e-mail.

fig31

Our next option was to use Report Service documents, and if that failed we would try out HTML document solutions.   Both options were tried, and although they did deliver the reports in an acceptable format, the file size of the dashboard was still between 1 and 2 MB.   The problem with load time had been solved, but the dashboard was still just a bit larger than desired.   (a Narrowcasted excel attachment of the reports only totalled 100kB)

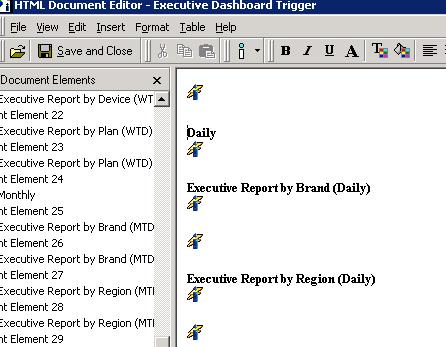
It was at this time that we started working directly with the Narrowcast server document (the first option in the picture above).  What we found is that server documents are very easy to create.  Basically they involve inserting grid reports onto a blank template as show below:

fig32

The end result was a very nicely formatted dashboard/e-mail with a file size of around 800kB.

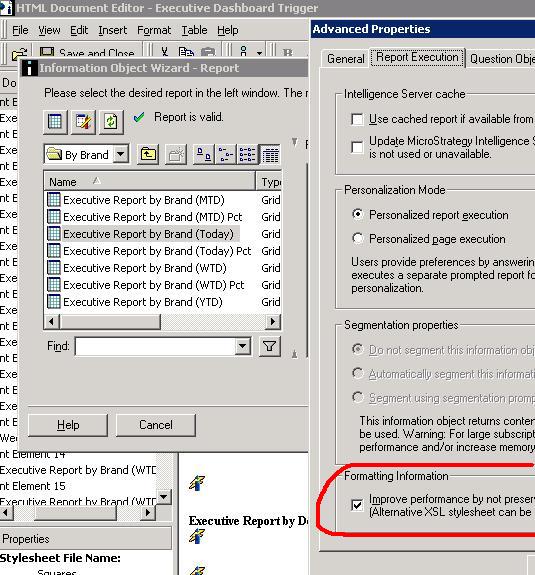
Although we could have lived with this result, we still felt there was room for improvement.   We knew from experience with other BI tools that similar e-mailed reports were coming through at half the size, so we wanted to investigate a little bit more.  What we found were 2 more settings that could be applied.   First off, under the Advanced Properties of each document object, there was a setting to ‘Improve performance by not preserving the grid reports formatting’, as shown below:

fig33b

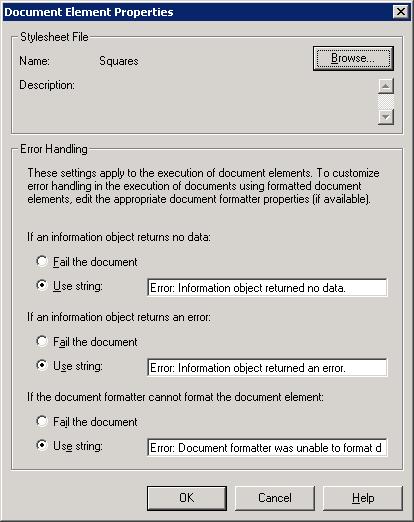
Next from each report object’s Document Element Properties, there is a place to specify your own style sheet, which your Narrowcast server should have access to.   It is this setting that will give your report more formatting then just text.   See the picture below that shows we picked the stylesheet called ’Squares’.

fig34

With these changes, we were able to get the e-mail down to 400kB, and acceptable size, and even a bit better than we expected.   I realize this is alot of detailed technical information, but hopefully, this case study shows the various options of emailing with the Narrowcast server.  If the report does not need to be directly viewable in the e-mail’s body, then attachments are definitely the best way to go, but otherwise, I’m pretty sold on using Narrowast Server documents with style sheets.

Questions for Narrowcast Server Essentials

  1. __________________ is responsible for the creation, formatting, transmission and administration of information services.

  1. ________________ is responsible for the gathering of user profiles and preferences through a web-based subscription site.

  1. Narrowcast Server information transmitters transmit services using _________ and _________.

  1. Which of the following are the featured components of Narrowcast server –

  1.  
    1. Narrowcast Administrator
    2. Delivery Engine
    3. Portal Administrator
    4. Subscription Engine
    5. Subscription Portal
    6. Alerts Engine

Answer Choices

i. a, b, c, d, e

ii. a, b, c, e, f

iii. a, b, d, e, f

iv. a, b, c, d, e, f

  1. Match the following –

Module

Function

a. Information Source

i. Connect to local or remote systems such as SMTP, SMS, WAP servers to deliver formatted content

b. Information Transmission

ii. Transforms raw data provided by information source into formatted message, output formats supported being text, HTML and Excel by default

c. Document Formatting

iii. Used to retrieve personalized information from local or remote systems such as Intelligence Server.

  1.  
    1. a à i, b à ii, c à iii
    2. a à ii, b à i, c à iii
    3. a à iii, b à i, c à ii
    4. a à iii, b à ii, c à i

  1. A service can have different publications each supporting a different language.
    1. True
    2. False

  1. The three different information to defined for an e-mail (SMTP) content are _____________________, ______________________ and ______________________.

  1. ________________________ is used to view the log when a service is run.

  1. Which of the following are true?

  1.  
    1. Content information object pulls dynamic data from an information source.
    2. Document is a complete formatted object which can have both static content and dynamic content
    3. Document can contain only one information object
    4. Publication is a collection of documents specifying the content of a service
    5. Publications specify information transmission module, locale and devices

Answer Choices

i. Only a, c and d

ii. Only a, b and d

iii. Only a, b, d and e

iv. a, b, c, d and e

  1. Which of the following are true?
    1. Information transmission module sets the rules for the types of documents supported by a publication
    2. Locale specifies regional characteristics like Language, number, date and time formats
    3. Device sets the formatting and transmission properties such as cell padding and embedding image support
    4. The device specified in the publication MUST match the device in the subscription set for a recipient

Answer Choices

i. Only a, b and d

ii. Only a, b and c

iii. a, b, c and d

iv. Only b, c and d Continue reading