Category Archives: Setup

MicroStrategy In CentOS

Recently I got an opportunity to work with one of the non certified or un supported OS for MicroStrategy. The task was to install MicroStrategy 931 on Cent OS 6.4

Though it was not supported or certified – I was able to install them with couple of workarounds

– First thing is, you would need to identify the required library to be install in OS ( either 32 bit or 64 bit libraries )

– If during the course of installation, you get some error stating the library is missed – then you just need to download that library for CentOS or Linux based libraries and then perform YUM install

– Then you should be able to proceed with the install successfully

– Similarly, during the process of configuring intelligence server/ DSN / Metadata setup – similar errors pop up and you should need to perform yum install of required libraries.

By this way, it works successful to install MicroStrategy on CentOS.

Hope MicroStrategy confirms it’s certification with CentOS soon !!

MicroStrategy System Manager – Awesome Tool !!

Recently explored the ‘System Manager’ component in MicroStrategy 9.3.1 version. it’s a very helpful tool for those working as Admin, project designer, project lead/manager (who handles entire BI-MicroStrategy components). This reduces the pain and helps to automate the entire schedule process example, if the narrowcast service dependent on cube and cube is on depend on data load, then it can be automated using ‘System Manager’ work flow.

The document (PDF) provided by MicroStrategy is very clear to understand and very easy to create any work flow. Only important point is, whoever design the work flow should capture every success and failure possibilities and handle those success/failures in the work flow.

What is work flow?

System Manager, it’s like a ETL Job, where you can create a workflow visually, allowing you to see the step-by-step process that leads the workflow from one process to the next. This visual approach to creating a workflow can also help you to notice opportunities to troubleshoot and error check processes as part of a workflow.

Here are the few important points to be known before developing any work flow. There is no code, program required to develop a work flow. It’s all about drag & drop and set the properties. For each object you drag & drop, properties can be set.

Work flow components:
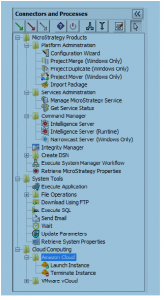
  1. Workflow – One Complete job is called Work flow (like in ETL tools, there can be one or more Workflow
  2. Parameters – For every step you can assign Name and values, which will make use of the values for the assigned job in the work flow
  3. Exit Codes – While defining the process (work flow), you can assign the exit codes, which says whether it’s success or failure and also description for the same. On the Properties pane, scroll down to the bottom and click Show Descriptions. Later we can see it in the example
  4. Connectors –

                           Success – If the current process is completed with an exit code that is defined as a successful status, the process that the success connector points to is the next process that is attempted.

If you use a success connector from a process, it is recommended that you also use a failure connector.

                           Failure – If the current process is completed with an exit code that is defined as a failure status, the process that the failure connector points to is the next process that is attempted.

If you use a failure connector from a process, it is recommended that you also use a success connector.

                          Continue – Regardless of the status of the exit code for the current process, the process that the continue connector points to is the next process that is attempted.

If you use the continue connector from a process, you cannot use any other connectors for that process.

  1. Decision – A decision process is created in the workflow, as shown in the image below. Decisions provide the ability to determine the next process in a workflow based on specific exit codes for the previous process, rather than just the simple success or failure of a process
  2. Toggle Entry Process – This enables or disables a process as an entry process for the workflow. A process that is defined as an entry process is displayed with a green flag symbol, as shown in the image below.


  1. While any process, other than an exit process, can be enabled as an entry process for a workflow, you should limit the steps that are enabled as entry processes for various reasons:
  2. Split Execution – A split execution process lets you start multiple threads in a workflow to perform parallel processing of the tasks in a workflow. This can speed up execution of a workflow for systems that can handle the parallel processing.
  3. Merge Execution – A merge execution process is created in the workflow
  4. Comment icon – comment is created in the workflow. Comments can be used to provide additional explanation to the design of a workflow
  5. Exit Workflow – An exit process allows you to end a workflow as well as explain how the workflow ended.
  6. Validate Workflow – If the workflow is listed as valid, click OK to close the dialog box. If the workflow is not valid, click Details to review the reasons why the workflow is not valid. Click OK and make any required changes to the workflow. Once all changes are made, validate the workflow again.
  7. Log – Log file can be generated for the work flow
  8. Properties and parameters – Storing user credentials within System Manager introduces a security risk. Configuration information is not known until or during the actual configuration.
  9. Parameters can be stored as a file and reuse it in any work flow

There are more features available in MicroStrategy System Manger, those can be find in MicroStrategy’s supporting PDF and help menu in System Manager.


Installation problem in servers

In few version like Windows 2003, Vista; installation may stuck due to firewall issue or security issues.

How to resolve this? This issue may appear because of the 3rd party utilities.

Steps:

1)       Install manually all the 3rd party installation under MSTR setup package

2)      Remove the 3rd party installation setups from the MSTR package (from 3rd party folder)

3)      Now install MSTR setup

4)      MSTR setup will skip the 3rd party utilities since it’s not present in the 3rd party folder.

Silent installation/Un-Installation

Two files required to install/un-install using silent method.

1)      Setup.iss

2)      Response.ini

Once the two files are created place it in the folder where setup.exe place (installation setup) exist.

Open command prompt and type the following command to install the same.

D:\MSTR\Installations\Setup.exe –ResponseFile=”D:\mstr\response.ini” –s  -f1D:\mstr\setup.iss –f2D:\mstr\setup.log

Example: Setup.iss

[InstallShield Silent]

Version=v7.00

File=ReponseFile

[File Transfer]

OverwrittenReadOnly=NotToAll

[Application]

Name=MicroStrategy

Version=9.0

Company=MicroStrategy

Lang=0009

[{B339F3B3-E78C-45E8-B4D2-3C46C1C13663}-DlgOrder}

Count=0

Example: Response.ini

[Installer]
HideAllDialogs=TRUE
ForceReboot=TRUE
StopAllServices=TRUE
EnterpriseManagerOverwrite=TRUE
CreateShortcuts = TRUE
ShowConfigWizard = FALSE
RunConfigWizard = FALSE
StopIIS = TRUE
AnalyticsOverwrite = TRUE
TutReportingOverwrite = TRUE
EnableTracing = TRUE
ShowWelcomeScreen = FALSE
ConfigWizardResponseFile = response.ini
CheckTCPIP=TRUE
CheckIIS=TRUE
CheckSP=TRUE
OverwriteDSN = TRUE
[Welcome]
HideDialog=TRUE
RemoveAll=FALSE
[UserRegistration]
HideDialog=TRUE
UserName=MicroStrategy Brasil
CompanyName=MicroStrategy Inc.
LicenseKey=<KEY>
[SetupType]
HideDialog=TRUE
Type=Typical
[SuiteTarget]
HideDialog=TRUE
TargetDirectory=D:\Program Files\MicroStrategy
[ComponentSelection]
HideDialog=TRUE
### Visible Components ###
DesktopAnalystVisible=TRUE
DesktopDesignerVisible=TRUE
ArchitectVisible=TRUE
ProjectBuilderVisible=TRUE
ServerAdminVisible=TRUE
CommandManagerVisible=TRUE
EnterpriseManagerVisible=TRUE
ObjectManagerVisible=TRUE
IServerVisible=TRUE
SDKVisible=TRUE
AnalyticsModulesVisible=TRUE
NCSAdminVisible=TRUE
DeliveryEngineVisible=TRUE
SubscriptionEngineVisible=TRUE
SubscriptionPortalVisible=TRUE
JMSGatewayVisible=FALSE
WebGatewayVisible=FALSE
TutorialReportingVisible=TRUE
TutorialDeliveryInstallVisible=TRUE
TutorialDeliveryConfigureVisible=TRUE
WebReporterVisible=TRUE
WebAnalystVisible=TRUE
WebProfessionalVisible=TRUE
WebUniversalReporterVisible=TRUE
WebUniversalAnalystVisible=TRUE
WebUniversalProfessionalVisible=TRUE
WebServicesJSPVisible=FALSE
WebServicesASPNETVisible=TRUE
OfficeVisible=TRUE
eTrainerForWebVisible=TRUE
FunctionPluginVisible=FALSE
SequeLinkVisible=TRUE
IServerOLAPServicesVisible=TRUE
IServerReportServicesVisible=TRUE
### Components to Install (TRUE) or Remove (FALSE) ###
DesktopAnalystSelect=TRUE
DesktopDesignerSelect=TRUE
ArchitectSelect=TRUE
ProjectBuilderSelect=TRUE
ServerAdminSelect=TRUE
CommandManagerSelect=TRUE
EnterpriseManagerSelect=TRUE
ObjectManagerSelect=TRUE
IServerSelect=TRUE
SDKSelect=TRUE
AnalyticsModulesSelect=TRUE
NCSAdminSelect=TRUE
DeliveryEngineSelect=TRUE
SubscriptionEngineSelect=TRUE
SubscriptionPortalSelect=TRUE
TutorialReportingSelect=TRUE
TutorialDeliveryInstallSelect=TRUE
TutorialDeliveryConfigureSelect=TRUE
WebProfessionalSelect=TRUE
WebUniversalReporterSelect=TRUE
WebUniversalAnalystSelect=TRUE
WebUniversalProfessionalSelect=TRUE
WebServicesJSPSelect=FALSE
WebServicesASPNETSelect=TRUE
OfficeSelect=TRUE
WebServerASPNETSelect=TRUE
WebUniversalServerJSPSelect=TRUE
WebUniversalServerASPSelect=TRUE
eTrainerForWebSelect=TRUE
FunctionPluginSelect=
SequeLinkSelect=TRUE
IServerOLAPServicesSelect=TRUE
IServerReportServicesSelect=TRUE
[Programfolder]
HideDialog=TRUE
Name=MicroStrategy
[ServerDefinitionSetting]
HideDialog=TRUE
OverwriteServerDefinition=FALSE
[WebVirtualDirectory]
HideDialog=TRUE
VirtualDirectory=MicroStrategy
ReconfigureVirtualDirectory=TRUE
[PortalVirtualDirectory]
HideDialog=TRUE
VirtualDirectory=NarrowcastServer
ReconfigureVirtualDirectory=TRUE
[WebServicesVirtualDirectory]
HideDialog=TRUE
VirtualDirectory=MicroStrategyWS
ReconfigureVirtualDirectory=TRUE
[TutorialReportingSetting]
HideDialog=TRUE
OverwriteDSN=FALSE
[WebVirtualDirectory]
HideDialog=TRUE
VirtualDirectory=MicroStrategy
ReconfigureVirtualDirectory=TRUE
[PortalVirtualDirectory]
HideDialog=TRUE
VirtualDirectory=NarrowcastServer
ReconfigureVirtualDirectory=TRUE
[WebServicesVirtualDirectory]
HideDialog=TRUE
VirtualDirectory=MicroStrategyWS
ReconfigureVirtualDirectory=TRUE
[OfficeWebServicesURL]
HideDialog=TRUE
AllowBlankURL=FALSE
URL=http://localhost/MicroStrategyWS/mstrws.asmx
[MSOfficeLoadOptions]
HideDialog=TRUE
ConfigureExcel=TRUE
ConfigurePowerpoint=TRUE
ConfigureWord=TRUE
[IServerServiceAccount]
HideDialog=TRUE
SkipAccountSetting=FALSE
Login=Administrator
Password=
ServiceStartUp=AUTO
[NarrowcastServiceAccount]
HideDialog=TRUE
SkipAccountSetting=FALSE
Login=Administrator
Password=
[Summary]
HideDialog=TRUE
[Finish]
HideDialog=TRUE

To add/remove components; Change true or false for components.

MicroStrategy 9.0 Hotfix 1 goes GA

MicroStrategy 9.0 Hotfix 1 is now generally available (GA) on the MicroStrategy Download Site.

Defects and Enhancements addressed in MicroStrategy 9.0 Product Suite can be found in the ReadMe.

But…

I’m wondering: Why this HotFix was released too close from the 9.0 launch?

Well…

A HotFix is a FIX! Therefore the 9.0 version was released with a number of bugs that had required this fast paced HotFix.

Question:

May I stay with my 8.x version or upgrade to 9.0?

Look close to MSTR 9.0 improvements and ask yourself if you need this upgrade. If no, then stay calm and wait for a second hotfix.

Bye